

What you need
- two sheets black A4 or letter sized poster board (8 1/2 x 11 inch).
- scotch (= non-shiny) tape
The patterns
Print out the patterns and check if they measure as indicated. If not, make necessary adjustment. Cut out all parts, and trace them on the black craft paper.
How to make the cap
The cap exists of three parts: the base (around the head), the top, which is a circle, and the projecting brim above the eyes (like a baseball cap). To allow for bigger or smaller heads, the base around the head can be adjusted at the back of the head.

The base
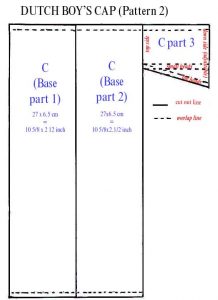
- Cut out C parts 1, 2 and 3 along the lines (Pattern 2). Make the them into one long strip by attaching the overlapping sides with tape.
- The long strip of the base is has a longer and a shorter side. The shorter side will be attached to the top. The longer at the bottom will be used for proper fitting.
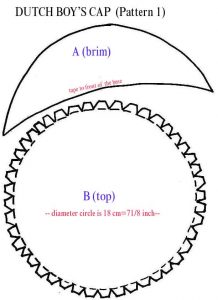
- Top B is a circle with tabs for attachment to the base. Cutout the top with the tabs along the thick line. Fold the tabs inward.
- Put top B on the table with the tabs sticking up. Carefully fold base C, with the shorter side facing top B, around the circle, and attach with pieces of tape. Keep the tabs inside. The circle should just close on the top. The bottom part is still open for the right fitting.
- Put the cap on the child’s head with the open side at the back. Attach both ends of the base with tape according to size.
The brim
Cut out brim A from pattern 1 along the thick line. Attach the bring to the front, using tape on the inside. The front should slope down, not up.
There you are, all done!