
If you want to act out stories from the Underground Railroad or other stories in which puppets need transportation, you may want to use a horse and wagon. In our printable library you will find a template for a horse’s main body, and one for two connected legs that move. In this tutorial I am only demonstrating the use of an open wagon. I will deal with the covered conestoga wagon (which requires extra support) another time.
Horse and wagon shipping Henry “Box” Brown
Making the horse and wagon
The horse and wagon can be downloaded from the templates in the section for Transportation. The horse is connected to the wagon by a beam, made of a full barbecue skewer that is covered by hard velcro (you can also just attach velcro at the front and back), To attach the velcro to the horse, while still enabling the legs to move, attach a strip of paper to the horse’s neck with a piece of soft velcro at the height of the beam.
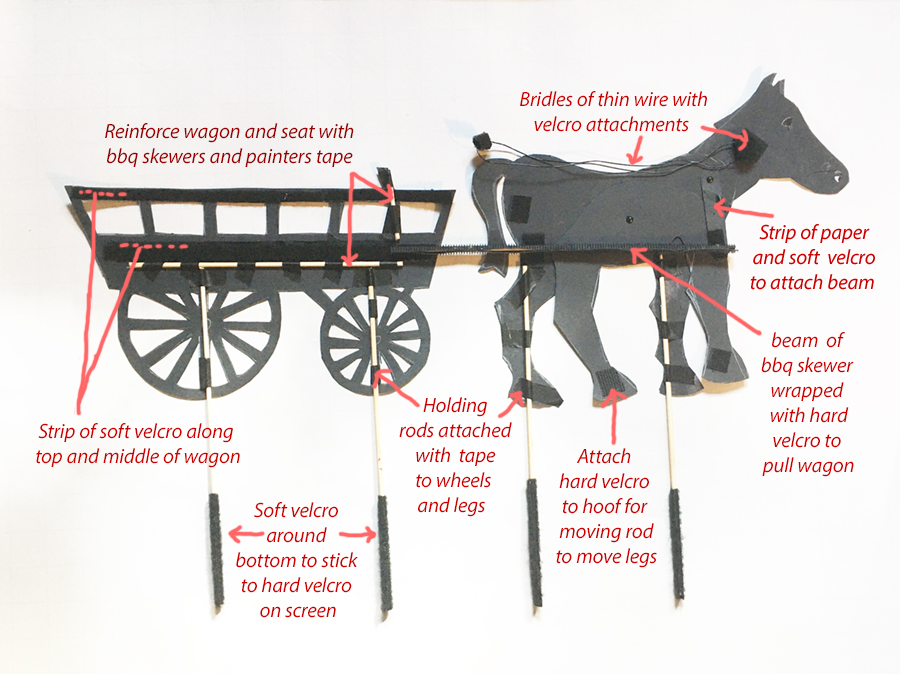
For the holding rods attached to the wheels and legs use full barbecue skewers, which you attach with strips of painters tape to the middle spokes of the wheel and the two legs of the horse that are not moving. Attach a long piece of soft velcro to the bottom of the rods to secure them to a strip of hard velcro underneath your screen.
Driver with bending knees
Choose a template in the Printable Library to be used or adjusted as your driver. If you choose a male driver, cut out the upper and lower leg twice instead of using the straight leg. If you want to have a woman driver, use the template for Harriet Tubman and adjust or choose a different head.
- Template for any person with bending knees
- Template for Harriet Tubman
The driver of the wagon will have to sit at the front of the wagon, where there is a little seat. If you have put a strip of soft velcro on the wagon rail, stick a piece of hard velcro to the driver’s buttocks to make him or her stay in place.
Simulating movement
The screen that I use for classrooms is less than 4 feet wide, so a horse and wagon take up a lot of space. One way to make a horse and wagon move is by having it carried by two children past the screen. This usually works best is the screen is larger, as is done in this classroom performance of the story of Henry Box Brown, in which students also use sounds for the vehicles used.
A second way is to attach the holding rods of the horse and wagon to a velcro strip underneath the screen and make the legs of the horse move, as demonstrated in the video above. Since you will need to keep the driver close to the screen you can use a moving rod to make him or her move the bridles. You can make clucking sounds for the horse’s hooves to accompany the narrator’s story.
A third way to simulate movement is using a moving background on a scroll of transparent film. Below a link with instructions how to make one for the portable screen that I use, in which I tried out using color for a story about Harriet Tubman’s escape from slavery. Since, I have also used it in a black-and-white performance of the story of Henry “Box” Brown, using clear film and black stick-on plastic for non-moving persons and crops.