
In this tutorial you will learn how to make a shadow puppet using the “mix-and-match” templates in our Printable Library. These templates are designed to make puppets in 19th clothes, but can easily be adjusted to other time periods by doing Google image research. For other puppets in the Printable Library you can also use one of the instructional videos below, which shows you how to put a puppet together from beginning to end.
- Instructional video how to make silhouette puppets of any historical figure using free online tools
- Instructional video how to make silhouette puppets from Bible Stories templates (mix-and-match)
- Instructional video how to make a puppet with rods using velcro (example: Pegasus)
- Instructional video how to make a puppet using rods with painters/duct tape (example: Wolf)
- Supplies
Using templates from the Printable Library
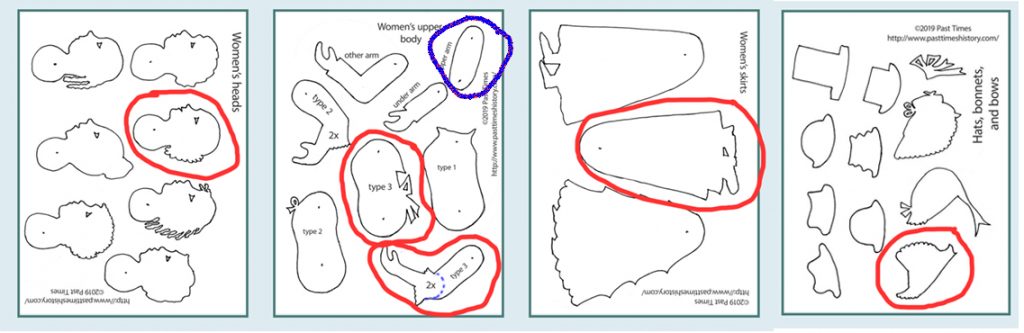
For this tutorial I chose to make a Quaker woman to help students act out stories from the Underground Railroad. Quakers dressed a little plain so I selected the head and body parts that are circled in red and the plainest bonnet.
- Cut out the selected body parts from your printouts with plenty of white space around them, and stick them to a piece of black poster board with a piece of double folded tape. Cut out the body parts along the lines.
- Use the point of a sharp scissor to pierce the spots where you will connect body parts (shown as black dots).
- Use pointed sharp scissors to cut out the eye or a hole puncher. You can make an iris by taping a little piece of black paper behind the eye socket (see example below).
- Remove the printout part and tape.
- Make sure you have two arms. If you don’t need bending arms just cut one arm twice using double folded black posterboard, or by tracing the arm you already cut. If you want an arm to bend at the elbow, cut out the upper arm circled in blue and adjust the sleeved arm by cutting it off above the elbow (give it plenty of space for the metal brad to connect the parts–see example on the right).
- Attach the bonnet to the head with tape (use velcro if you want to be able to take it off). Do the same with hats for male puppets. In the example below I decided to trim the bonnet in the middle to make it a bit more modest for the Quaker puppet.
- You can let puppets hold luggage, a baby, or a walking stick by attaching the items with velcro.

How to put the puppet together

- If you chose for bendable arms connect upper and lower arms with a metal brad.
- Connect head, upper arm and upper body. They all connect at the same spot at the shoulder. Move the head forward and backward and cut away any extra paper that sticks above the neck and chest.
- Connect upper and lower body at the waist. The Harriet Tubman puppet in in the Printable Library has an upper, middle, and lower body part, so that she can hide and row a boat.
- If you are making a male puppet you have the option to make a leg bend, which will allow you to walk or run.
Adjusting body shapes and faces
It is quite likely that your puppet ends up a little different from the template because cutting out the parts precisely is difficult. That is totally okay–it gives the puppet personality, and the templates are only meant to be examples.
You can make adjustments by cutting away paper, or adjust the patterns. The more you can make a puppet your own, the better it is!
Clothes and glasses
If you would like to have more options to dress up your puppet you can always do image research.
- If you google “19th century fashion” and choose “Images” underneath the search bar you get these results.
- An image search for runaway slaves gives you options to dress your puppets for Underground Railroad stories. You will see that women often wore head wraps, which you can imitate by wrapping a thin piece of tissue paper around the head.

For glasses you can use thin beading or “memory” wire and stick the temple on the back showing the lens on the nose only. Alternatively (as in the case of Rosa Parks) have the temple at the front and lead it through a hole to the back, where you fold it flat and attach it with tape.
Holding and moving the puppets
To hold and move puppets you use rods, made of barbecue skewers, which you attach to the puppets with velcro (clip off the sharp point first). You only need one holding rod and one moving rod, since you only have two hands! It is easiest to attach the velcro to the side of the puppet that is not held against the screen.
- Moving rod: attach a small piece of scratchy velcro to the piece of the puppet that you will want to move. Most likely that will be an arm. Wrap a piece of soft velcro around the tip of your moving rod and connect with the moving part of the puppet. You will see that you can bend the puppet by the waist just by using the arm rod. If you want to move a leg to walk or run, also put a piece of scratchy velcro on the lower leg.
- Holding rod: attach a piece of soft velcro to the top of the barbecue skewer and a piece of scratchy velcro to a free spot in the middle of the puppet, where it will not be in the way of a moving arm. If you need to attach the puppet to the back of the screen, you will need scratchy velcro at the bottom of the holding rod too, as seen in the image below.


Hello,
I’ve been using your templates for Peter and the wolf for 3 years now and my students love creating their own puppets and bring them home. I am a teacher in a primary school for gifted students in Switzerland. Thank you so much for sharing!
Stephanie
Thank you so much for letting me know, Stephanie! I can see that my patterns are downloaded all around the world but I hardly hear from anybody what they do with it. So this means a lot!
Hi Helene,
Thank you. Your website and information is very helpful.
Thank you,Terence!!